Write and test policies
Learn how to write and test policies for SBOM evaluation and compliance.
Learn how to create policies using the Visual Builder for simplicity or code-based approaches (Rego/JavaScript) for advanced control.
Why Policies Matter
Policies transform vulnerability data into actionable compliance requirements. Instead of manually reviewing large volumes of vulnerabilities, policies:
- Enforce internal standards — Define organizational security rules and enforce them automatically
- Meet regulatory requirements — Ensure compliance with mandates (NIS2, CRA, DORA, SEC, etc.)
- Honor customer contracts — Implement SLA commitments and customer-specific security requirements
- Prioritize efficiently — Focus teams on violations that matter, reducing noise and decision fatigue
- Automate compliance — Replace manual reviews with continuous policy evaluation
- Scale security — Apply consistent standards across all components and teams
A policy might require all production libraries to have no unresolved high-severity vulnerabilities, or ensure SBOM metadata complies with NTIA Minimum Elements. Instead of sifting through hundreds of CVEs, teams see clear violations of their defined standards.
Create Your First Policy
For step-by-step guidance, see First Policy tutorial.
Quick overview:
- Navigate to Policies in SBOM Observer
- Click Create Policy
- Configure basic settings (name, scope, description)
- Define rules with conditions
- Preview to test policy behavior
- Save to activate
Once created, policies evaluate automatically on every SBOM upload or vulnerability update.
Choose Your Approach
You can create policies visually or as code. Use the Visual Builder for a quick, no-code setup, or choose Rego or JavaScript when you need advanced logic, version control, or more complex conditions.
Select your preferred approach below to see detailed examples and implementation guidance:
Visual Builder
The Visual Builder provides a graphical interface to create policies without writing code.
Policy Configuration
Policy Sidebar contains:
- Policy Name: Descriptive name for identification
- Enabled Toggle: Activate or deactivate the policy
- Scope: Define what the policy evaluates (e.g., Components)
- Priority: Set evaluation order for multiple policies
- Description: Explain the policy's purpose
Building Rules
Rule Builder lets you define conditions:
- Rule Name: Label for the rule
- Violation Message: Custom message displayed when violated
- Violation Severity: Impact level (any value from 0.0 to 10.0, used for prioritization)
Adding Conditions:
- Property Dropdown: Select property (e.g.
vulnerability.severity) - Operator Dropdown: Choose comparison (equals, greater than, etc.)
- Value Field: Set comparison value
Combining Conditions:
- Multiple statements in one rule = AND logic (all must match)
- Multiple rules in one policy = OR logic (any can match)
Action Buttons
- Cancel: Discard changes
- Preview: Test policy without saving
- Save: Apply changes to policy
- Convert to Rego: Transform to code-based policy
- Save a Copy: Duplicate policy configuration
Conversion Warning
Converting to Rego is irreversible. Save a copy first to preserve the visual version.
Rego Policies
Rego is a declarative language from Open Policy Agent (OPA) designed for policy evaluation over structured data.
Why Use Rego?
- Version Control: Track policy changes in Git
- Advanced Logic: Complex conditions beyond visual builder
- Consistency: Same policy across all environments
- Industry Standard: Used by Kubernetes, Terraform, cloud platforms
Input Data Structure
Policies receive input data with:
Component properties:
id,name,version,typepackageUrl(PURL format)licensesarrayinternalflag (true for first-party code)
Vulnerability properties:
severity(0-10 CVSS score)vendorId(CVE identifier)epss(Exploit Prediction Scoring System)vex(Vulnerability Exploitability eXchange status)
VEX States:
not_affected— Component not impactedfalse_positive— Incorrectly flaggedresolved— Fixed in current versionresolved_with_pedigree— Fixed with verification
Rego Example
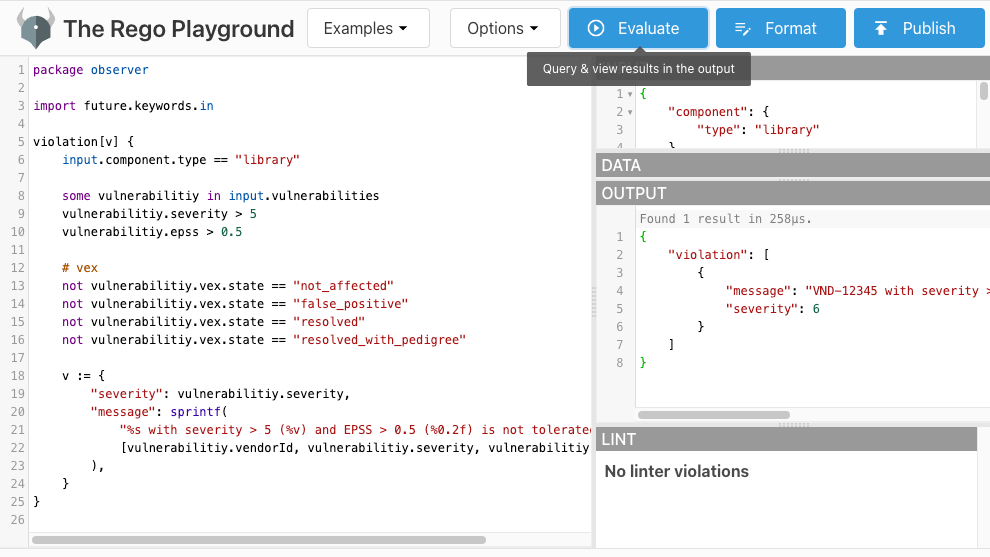
This policy flags libraries with high-severity vulnerabilities and high EPSS scores that don't have VEX resolutions:
package observer

import future.keywords.in

violation[v] {
	input.component.type == "library"

	some vulnerability in input.vulnerabilities
	vulnerability.severity > 7
	vulnerability.epss > 0.5

	# Exclude VEX-resolved vulnerabilities
	not vulnerability.vex.state == "not_affected"
	not vulnerability.vex.state == "false_positive"
	not vulnerability.vex.state == "resolved"
	not vulnerability.vex.state == "resolved_with_pedigree"

	v := {
		"severity": vulnerability.severity,
		"message": sprintf(
			"%s with severity>7 (%v) and EPSS>0.5 (%0.2f) is not tolerated",
			[
				vulnerability.vendorId,
				vulnerability.severity,
				vulnerability.epss,
			],
		),
	}
}
Notice how the policy accesses input.component.type, input.vulnerabilities, and vulnerability.vex.state — these correspond to the input data structure described above.
Test in Playground
Use the Rego Playground to test policies interactively:
- Paste the policy code into the editor
- In the input section, paste the sample input data
- Click Evaluate to run the policy
- Review the violation output
The playground provides instant feedback, making it ideal for both learning Rego and debugging complex policies.
JavaScript Policies
JavaScript policies offer flexibility with a familiar language. Define a Policy function that returns violations.
Input Data Structure
Policies receive input data with:
Component properties:
id,name,version,typepackageUrl(PURL format)licensesarrayinternalflag (true for first-party code)
Vulnerability properties:
severity(0-10 CVSS score)vendorId(CVE identifier)epss(Exploit Prediction Scoring System)vex(Vulnerability Exploitability eXchange status)
VEX States:
not_affected— Component not impactedfalse_positive— Incorrectly flaggedresolved— Fixed in current versionresolved_with_pedigree— Fixed with verification
Policy Function Structure
The Policy function:
- Accepts parameters:
{ component, vulnerabilities, namespace } - Processes logic: Evaluate conditions using JavaScript
- Returns violations: Array of violation objects
- Returns null: When no violations found
JavaScript Example
This policy flags components with vulnerabilities above severity threshold:
function Policy({ component, vulnerabilities }) {
  const SEVERITY_THRESHOLD = 7;

  if (vulnerabilities && vulnerabilities.length > 0) {
    return vulnerabilities
      .filter((vulnerability) => vulnerability.severity > SEVERITY_THRESHOLD)
      .map((vulnerability) => ({
        severity: vulnerability.severity,
        message: `${component.name} has a high-severity vulnerability (ID: ${vulnerability.vendorId}, Severity: ${vulnerability.severity}). Immediate attention required.`,
      }));
  }

  return null;
}
Notice how the function accesses component.name, vulnerability.severity, and vulnerability.vendorId — these correspond to the input data structure described above.
Benefits of JavaScript
- Familiar syntax for most developers
- Standard library access for string manipulation, dates, etc.
- Flexible logic with loops, conditionals, functions
- Easy debugging with conventional tools
Input Data Reference
Policies receive structured JSON input with component and vulnerability data. The example below can be used for testing in the Rego Playground:
{
  "component": {
    "id": "34c0f4772324dec6d00af7127a6f7454f655bc0d",
    "packageUrl": "pkg:npm/zod@3.21.4",
    "type": "library",
    "version": "3.21.4",
    "name": "zod",
    "licenses": [{ "license": { "name": "MIT" } }],
    "createdAt": "2023-10-30T18:28:35.757164+01:00",
    "updatedAt": "2023-10-30T18:28:35.761883+01:00"
  },
  "vulnerabilities": [
    {
      "id": "8820c737e3913979bead47ce9e309ea153e1f7d1",
      "severity": 7.5,
      "vendorId": "CVE-2023-4316",
      "epss": 0.00046,
      "vex": {
        "state": "not_affected",
        "justification": "requires_configuration"
      }
    },
    {
      "id": "a1b2c3d4e5f69780b1c2d3e4f5a67890b1c2d3e4",
      "severity": 8.8,
      "vendorId": "CVE-2023-9999",
      "epss": 0.6
    }
  ],
  "namespace": {
    "tenantId": "org-4dec6d00af7127a6",
    "space": "default"
  }
}
When testing with this data: The example Rego policy flags CVE-2023-9999 (severity 8.8, EPSS 0.6, no VEX) but not CVE-2023-4316 (VEX state resolved).
Testing Policies
Preview Before Saving
Always preview policies to verify behavior and results before activation.
Preview in Visual Builder
- Configure policy rules
- Click Preview button
- Review violations list
- Adjust rules as needed
- Save when satisfied
Test JavaScript Locally
- Copy policy function
- Create test input JSON
- Run locally with Node.js
- Verify violation output
- Upload to SBOM Observer
Best Practices
- Start simple: Begin with Visual Builder, advance to code as needed
- Clear messages: Write descriptive violation messages
- Test thoroughly: Preview before deploying to production
- Version control: Store code-based policies in Git
- Document intent: Add comments explaining policy logic
- Exclude VEX: Don't flag vulnerabilities with VEX resolutions
- Use EPSS: Consider exploit probability, not just severity
Next Steps
- Enforce policies in CI/CD to block builds
- Understand policy concepts in depth
- Complete the First Policy tutorial
- View policy violations and take action